I did not take pictures of the process. But needless to say, step 1 is disassemble all the plastics (some partially) on the rear hatch and in the rear of the truck including popping down the headliner in the rear.
Its a chore to do.
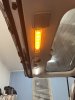
I installed
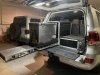
2x National Luna Touch lights, white/Amber
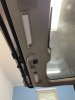
1 Cruiser outfitters rear access switch kit.
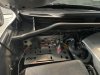
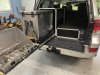
I ran the power wire through the center connector grommet for the wash system into the headliner area of the truck, then over and down to the cubby/jack area where I have the rest of my electrical wiring terminated for the Dual battery system to the rear Drawer panel on the passenger side.
The lights are joined up into an Anderson plug to the cable run so if I need to remove the panel, it's not hard wired and will come out with just an additional connection to unhook.
Notes on the Cruiser outfitters switch install, 1) USE THE RIGHT TEMPLATE!! - there are two, and I didn't. luckily I cut it in in order to trim it to fit so I could still work with what I had. The Correct 1:1template is in the hardware pack - I wish they would not include the other one in the instructions. or at least watermark it - DO NOT USE for cuts or something.
2) the Toyota wiring for the hatch release switch is really small, be careful crimping it and make sure you have a good crimp, with the right tool. You have to cut the OEM wires, also do not cut them super close to the plug. it makes it really hard to crimp them.
also just take the grommet off the rear hatch rubber grommet/tube (passenger side one) and pull the wires though to the inside, use a longer zip tie as a guide from the other side - you will have enough room to work that way. it takes a few minutes more but worth it.
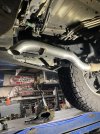
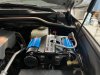
ARM Twin OBA - install notes. I wanted to access the fuse box normally. Hence these mods.
1) I spaced it up 3 washers and use longer M6 bolts (25mm if I remember right) - that brings it up so there is enough clearance to get the lid out easily.
2) I snorkeled the passenger side intake, its a compromise since straight up hits the hood sound deadening, and straight out 90 degrees hits the strut. just 1/4 NPT brass fittings from your local Big box hardware store will work for this. I used Home Depot. 1 street elbow, 1 M-M connector, 1 F-F connector - ideally order a M-F connector.
3) clocking the air line - put the nut on the connector in a vice and use vice grips to gently clock it 90 degrees. Not hard to do but not obvious how to do it.
4) I used a Slee compressor bracket. Pretty straight forward install instructions are good, just read them and keep them handy when doing it.
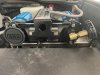
All power wiring, runs to the passenger side Slee accessory plate - this is not the final wiring setup (fyi..) Midi fuses will be installed when I do the rest of the electrical stuff on the rack and front bar that are yet to be purchased Install is straightforward, and works for what I have currently.
I used an EasyAS ignition sensing relay for the ignition signal in my truck, this is wired to the relay for the dash dock outlets and the ARB twin. I have no connections into the Toyota fuse panels. This is a 100% separate system with only 2 connections to the main battery.
The plate has 2 power posts, 1 for constant power (4ga cable run) and the other for Ignition sense needs (red) that will make future wiring easy and keep everything out of the main fuse panels.
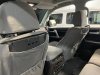
Victory 4x4 rear screen deletes - easy to do, except for getting the connectors out of the screen. Pita for some reason.
Next up is re-install the goose gear ultimate chef cabinets, and redo some of the mounts for the side panel to provide some protection for the outlets and battery monitor. Figure out a wing for the other side (water system maybe or just storage)..
anyway... work moves forward.


") Still working on paint, welding brackets, Jerry can mounts (AT Overland), Baja light installs (3 sets) and other stuff to finish it up in week or 2... I think my fuel mileage is going to suffer a bit.
Still working on paint, welding brackets, Jerry can mounts (AT Overland), Baja light installs (3 sets) and other stuff to finish it up in week or 2... I think my fuel mileage is going to suffer a bit.