2017 Power Wagon - Grace

Tim R.

Adventurist
Moderator
After several months of searching I settled on a new to me 2017 Ram 2500 Power Wagon. In keeping with the theme of our vehicles, this to is white. The truck happened to be a local truck that I had seen around town for the last few years. The owner is a mechanic and took meticulous care of the vehicle. I received a folder of maintenance, oil changes, oil sample tests, etc.

We chose the Power Wagon as we do like to go off the beaten path at times and living in the Southwest of the US there is plenty to explore.
In turn the wife does like to glamp occasionally and we will get a "small" trailer to pull with the truck.

This truck came with a few enhancements already installed:

-Thuren .5 Front Springs -
-Thuren tuned Fox 2.0 shocks
-Thuren Front Track Bar
-Thuren Rear Track Bar
-Synergy Drag Link
-Fox 2.0 ATS Steering Damper
-AEV Salta HD Wheels
-BFG KO2 37x12.5 tires
-AAM 5.13 Gearing front and rear
-Leer 100XL Camper Shell with -Yakima/Whispbar Crossbars
-Front and Rear bumpers Line-X'd
-Baja Designs flush mount reverse lights in rear bumper
-Line-X in bed
-Morimoto bi-LED Headlights and LED Fogs
-Factor 55 Prolink for the winch
-Firestone Airbags with Daystar Cradle
-Undercover Swing Case in truck bed
-Front window tint 35%
-Mopar all-weather floor mats
-White Knuckle Sliders (Xtra Width)
-Able Components Smartbar Full Bypass
-RIGD Mega-Fit Ultraswing with Frontrunner Table.

Future plans/ideas for the truck:
A GFC XL or AT Atlas
Synthetic Winch Line with upgraded fair lead.
AEV Snorkel
Upgraded sound system
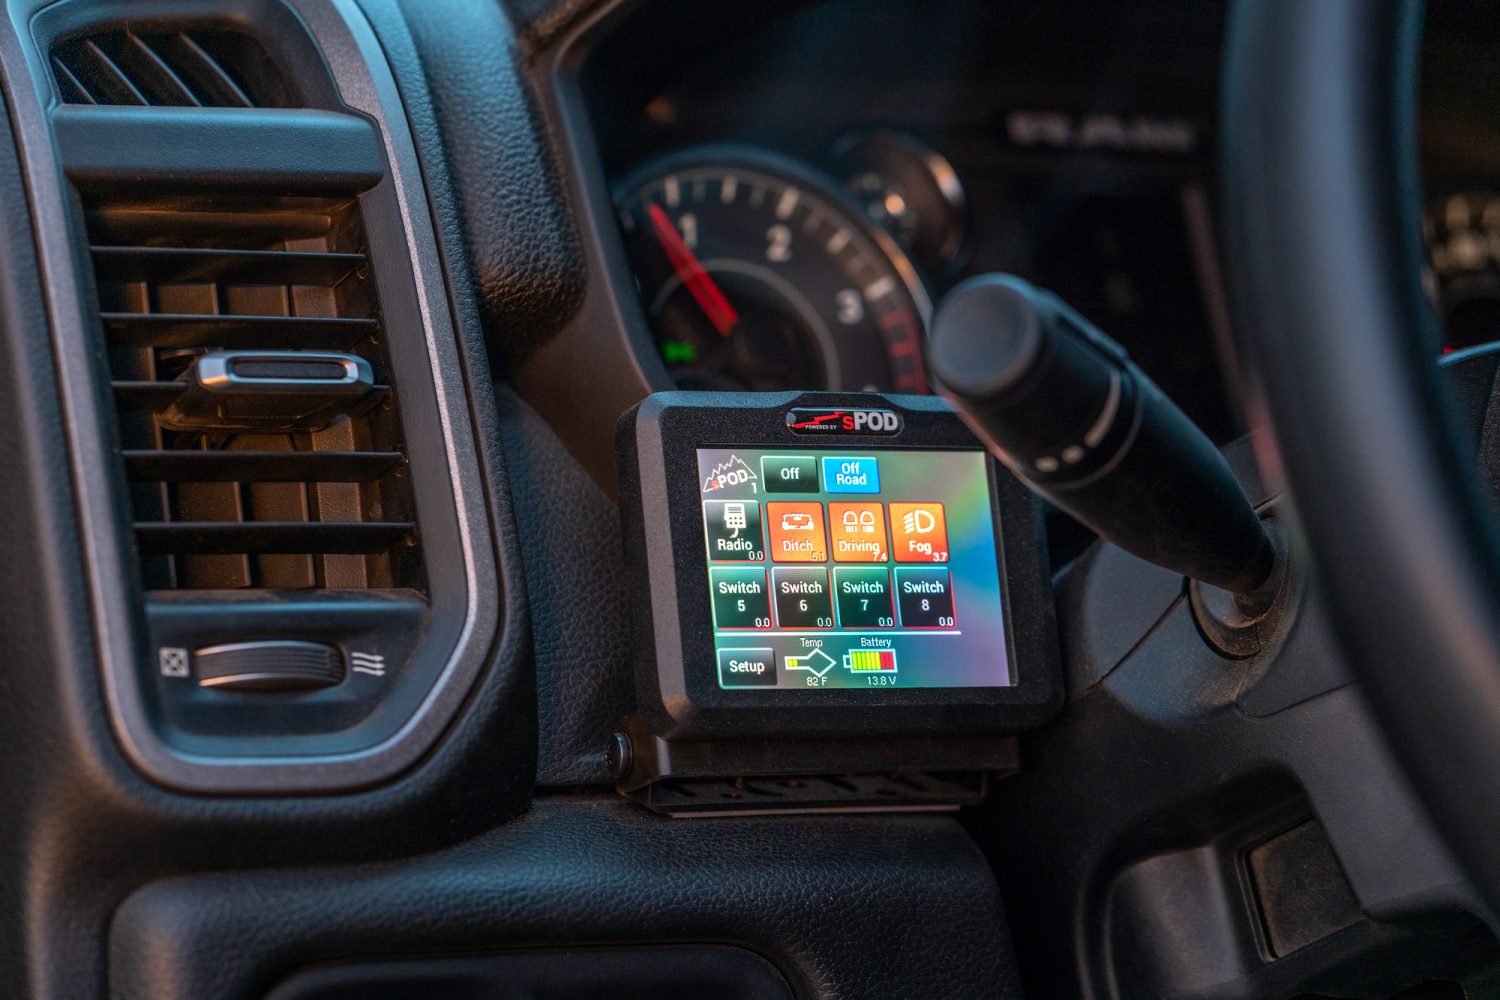
HAM/GMRS
Katskin seating upgrade for front
Goose Gear Rear Seat Delete (Cause Dogs)
received_8662974200386682.jpeg
 
Last edited:
The truck as you can see is a Tradesman Edition with the Power Wagon Package. Vehicle was originally purchased in North Central California in Aug 2017. It was #1452 for the year.
20220426_170503.jpg
20220426_170516.jpg
20220426_170538.jpg
20220426_170415.jpg
 
You should paint the 416 in yellow and red with white wheels lol. Throw on a small Little Tikes badge on it too for good measure.
 
Wanting more light, my first add on was going to be in the A-Pillar position on the truck and commonly called "Ditch Lights". I began this add on by searching for some appropriate and Made in USA brackets. I wanted to find some brackets that were beefy as I was going to add heavier lights (Baja Designs XL80S) to them.
I scoured the internet looking at different ones. I eventually settled on the A-Pillar brackets from SDHQ in Gilbert, Az. These brackets are CNC cut and mandrel bent in house. They are then powdercoated black.

Were they the cheapest? No. Chineseum sucks!!

Were they the easiest install? No. Didn't want that either.

Heres the link to the bracket:
https://sdhqoffroad.com/products/10-18-ram-2500-3500-sdhq-built-a-pillar-light-mounts

This link is for the 2500-3500 but the same item ID pops up for the 1500 and is mentioned in the instructions. Some install parts are 1500 specific.

SDHQ-31-1206-G4-1_1000bad2-a6b7-413c-afb5-bc308e73fc7b.jpg

The brackets come packaged in a appropriate size box (have you seen some Amazon boxed items) and supported with foam molded to the brackets. In addition to the brackets come the appropriate hardware to install them on 2010-2018 Ram 1500-3500 Trucks.
SDHQ-31-1206-G4-2_2df321f4-23af-4fed-b8ff-bbeaca6d96d3.jpg
20231026_113420.jpg
20231026_113431.jpg
20231026_121332.jpg


In the box you also get a list of included parts and on that list is a QR code you can scan to get the printable install instructions (also available directly on the website).
20231026_121559.jpg

Install begins with that almighty 10mm socket on a 1/4" ratchet or compact impact (I used my M12 Milwaukee Impact)
20231026_125145.jpg


Instructions have you trimming approximately 1/4" off each side including removing the windshield washer tube retaining clip. I used the combo of a Dremel with a cutoff wheel and a fresh blade on a razor knife for each side. I marked it with a silver sharpie for ease of visibility.
20231026_132527.jpg

After cutting the trip away and going as far back to beneath the windshield the bracket slides into place with a little manipulation. I held it in place with the 10mm fender bolt.
20231026_133630.jpg

The bracket sits around 1/8" from the hood
20231026_133639.jpg

The bracket is further held in place by adding a Grade 8-5/16" x 18 bolt in the rear hinge brace hole.
20231026_134910.jpg

The kit includes standard nuts. I had Nylok nuts on hand so replaced the standard nuts with those. No torque specs were included so I just made them "tight".
20231026_134916.jpg

This photo shows some of the required cowl trimming on both sides to fit the brackets.
20231026_140511.jpg
20231026_145120.jpg
20231026_145100.jpg

The brackets provide two mounting positions for lights. I'll see once I install the lights how each position looks and fits best.
20231026_145108.jpg

Finishing wasn't hard at all. Instructions say it takes 2 hours. I completed it in 1.5 hrs. These instructions aren't bad but could use some work and to those with minimal mechanical knowledge I could see this taking longer.

Overall though I wouldn't hesitate to purchase these again or other items from SDHQ again.
 
Last edited:
4x4 Spod Bantam Install with Baja Designs XL80 Auxiliary Lights in Amber Driving /Combo Lense

Purchased these items several months back and life just kept getting in the way.

4x4spod used to make a kit for the Rams but for reasons known only to them they stopped. I purchased the universal kit with several ideas on how to mount it.

I found one I liked on expeditionportal.com I liked (link below). One caveat was my truck lacked the reinforcement bars found on the 4th Gen Cummins and then the 5th Gen Gas/Cummins including the Power Wagons. I looked and the tabs existed in the rear of the engine bay above the firewall. I looked and finally located the correct reinforcement bars for both driver and passenger sides (link below) so purchased them.

The reinforcement bars arrived after a few weeks and I realized, hey no holes in the fenders for the front mount of the bar, whoops. But I then knew this called for RivNuts, of which I already possessed the kit. I made sure I had the correct mandrel for the size nuts and bolts I chose. While it may seem overkill for such, I went with 5/16" grade 8 hardware. I installed the rivnut, being sure to repaint the exposed steel before installing the insert itself. Install was flawless.

To be Continued......
1000015952.jpg


Acquired a @rigdsupply.com Mega-Fit Ultraswing off of Facebook Marketplace (saved over $1000.00 buying used). The Ultraswing came with the older @frontrunneroutfitters fold down table with the @rigdsupply.com HDPE cutting board that appears as though it was never used as does the table itself. The receiver is a 2 inch as the seller had an F150 and only required that size. I have ordered the 2.5 inch Wedgelock ($75.00 from Rigd) for the receiver on the Ram along with a new hardware kit for mounting the tire as the current ones were quite rusted ($15.00 from Rigd). The Ultraswing also came with the license light and mount that plugs into the 4 pin trailer plug ($55.00 value).
I'll post more photos as I reassemble it and put it on the truck as im doing a little maintenance.
20240424_170442.jpg

New hardware came in, nice Grade 8 bolts with locknuts.
20240428_143553.jpg

Hardware bag also included new wheel mounting bolts. These are M12x1.5x45mm bolts in 8.8 rating (similar to a Grade 5) which is cool because Grade 5 has been shown tohave improved shear strength over Grade 8.
20240428_143559.jpg

Used the original hardware for the table.
20240428_151903.jpg

Used a copious amount of white lithium grease(Recommended from Rigd) and was still hard as heck to slide into the receiver but got it in.
20240428_161127.jpg

Got the tire lifted up and mounted with new lug nuts from the hardware kit I ordered. (Going to buy a locking lug nut) The hole in the middle was bothering me so I had to make it AAV official.
20240428_164522.jpg


The anti wobble hitch definitely lives up to its name. You access it through the receiver (3/4inch socket). Zero wobble! Shaking it shakes the entire truck.

Quite the upgrade IMO.

Have to get the license plate mounted up still, then it will be ready to go on that.

I'm waiting on Rigd to have the BackUp Camera kit available which is currently on backorder. Back to using the old reliable mirrors until then.

Future Upgrades for the Ultraswing:
Sidehack
Powertank Propane Bottle Mount
Upgraded Locking Pin.
Rotopax Water Can with spout.
5th AEV Salta Wheel to match the ones on the truck.
......
 
Last edited:
Back
Top Bottom